Here's a quick tip on how you can adjust the mouse pointer speed in Windows 7:
1) Click Start menu, and then open Control Panel.
2) Then click on Hardware and Sound.
3) Now under Devices and Printers, click on Mouse.
4) The Mouse Properties box should pop-up, click on the 'Pointer Options' tab.
5) In the Motion section, adjust the pointer speed by dragging the toggle to the left or right
6) depending on if you want to slow down, or speed up the mouse pointer. You can also check the 7) Enhance pointer precision checkbox, for a more precise mouse pointer.
8) Click OK, to save your changes.
Showing posts with label backup software windows 7. Show all posts
Showing posts with label backup software windows 7. Show all posts
Monday, January 3, 2011

Thursday, June 17, 2010
Print a document in Windows 7
You can try to print any documents that already exist on your computer to see results from working printers that were installed in Windows 7. Easy enough, click the Popup menu and click Print. In this way you can print your document to the printer. But of course the result is still less satisfactory, because it is not configured properly.
To print to the printer produces a good and proper, after having been on file kalipada you double click the file, then this file will open automatically in accordance with the application program used to create the file. Because you have not installed any applications, then Windows 7 will display these files based on the compatibility of the files concerned with the applications in Windows 7.
As an illustration, the following describes some ways to print documents from Windows 7. This method is not absolute, because there's another way that can be used to print the document. Only here explained how to print the file or document directly without going through another application other than that provided by the application itself is Windows 7.
Right-click on a file or document that will be in print, after the popup menu appears click Print
Click the program, milsanya Wordpad, and not the document and click on the printer icon
You can also use Drag and drop commands. Do I click the Start menu, click Device and Printer and click Printer, then click the Document (s) in queue. Then click and hold your mouse on the document that will be in print, then remove the printer window is open.
To print to the printer produces a good and proper, after having been on file kalipada you double click the file, then this file will open automatically in accordance with the application program used to create the file. Because you have not installed any applications, then Windows 7 will display these files based on the compatibility of the files concerned with the applications in Windows 7.
As an illustration, the following describes some ways to print documents from Windows 7. This method is not absolute, because there's another way that can be used to print the document. Only here explained how to print the file or document directly without going through another application other than that provided by the application itself is Windows 7.
Right-click on a file or document that will be in print, after the popup menu appears click Print
Click the program, milsanya Wordpad, and not the document and click on the printer icon
You can also use Drag and drop commands. Do I click the Start menu, click Device and Printer and click Printer, then click the Document (s) in queue. Then click and hold your mouse on the document that will be in print, then remove the printer window is open.
Tuesday, February 9, 2010
Step to backup data in windows 7
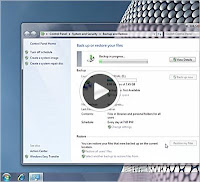 Create copies of data files and system image which includes system settings, programs and files with Windows Backup. Choose custom location in Windows 7 for data backup. You can check for this option under System and Security in your Control Panel and can also access it through Action Center.
Backup and Restore Center will show you the backup device you have selected, the space left on it, the space occupied by windows Backup and how far you are into the process if you are currently running a backup. Windows 7 backup facilitates you by providing access to your previous system image files for deletion, it also displays how much space is being used by each of its backup components.
Try the following steps to create backup:
1 Start the process of creating a backup from the Backup and restore center in the Control Panel.
2 Choose the location where you want to create your backup.
3 Network location can be selected to create backup. Add your network path by clicking Add New Location.
4 Choose what to backup, once you have chosen the location.
5 You can choose your own files as well as Windows chosen file.
6 Start backup process. the Backup and Restore center notifies that backup is in progress.
7 Restore the files once backup process is over.
But it is far more easier to backup your files over the network, if you are using Professional or Ultimate edition of Windows 7 then you need not keep the drives as you also have the option of backing up your files to a network.
You can set up your network to save the copies of critical files. It will surely proved to be a worthwhile investment as a Home Network backup can easily maintain the copies of the electronic data files thus securing the data in case of theft, disaster and computer failures. You have the option to choose from online service or Home Network backup. There are different methods using which you can set your data on Home Computer Network such as backups to CD-ROM or DVD-ROM discs, network backups to a local server and online backups to a remote hosting service.
In network backup to a local server you don’t require to burn several disks considering setting up a backup server on your home network. A backup server has a large hard disk drive and network to receive other home network files. In Network backup to a Remote Hosting Service many Internet sites offer backup hosting services which results in automatic network backups.
All these features help the user to have the full control over the flies which are backed up and you can have automatic backup capability with suitable software in Local Servers Backup. In Remote Hosted Backup your data is saved with lower risk from theft.
Subscribe to:
Posts (Atom)